Understanding Bathroom Vanity Drain Assembly

A bathroom vanity drain assembly is an essential part of any bathroom sink, responsible for efficiently channeling wastewater away from the sink and into the plumbing system. It consists of several components that work together to ensure smooth and reliable drainage. Understanding the function of each component and how they work together is crucial for proper installation, maintenance, and troubleshooting.
Components of a Bathroom Vanity Drain Assembly
The bathroom vanity drain assembly comprises several interconnected parts, each with a specific role in the drainage process.
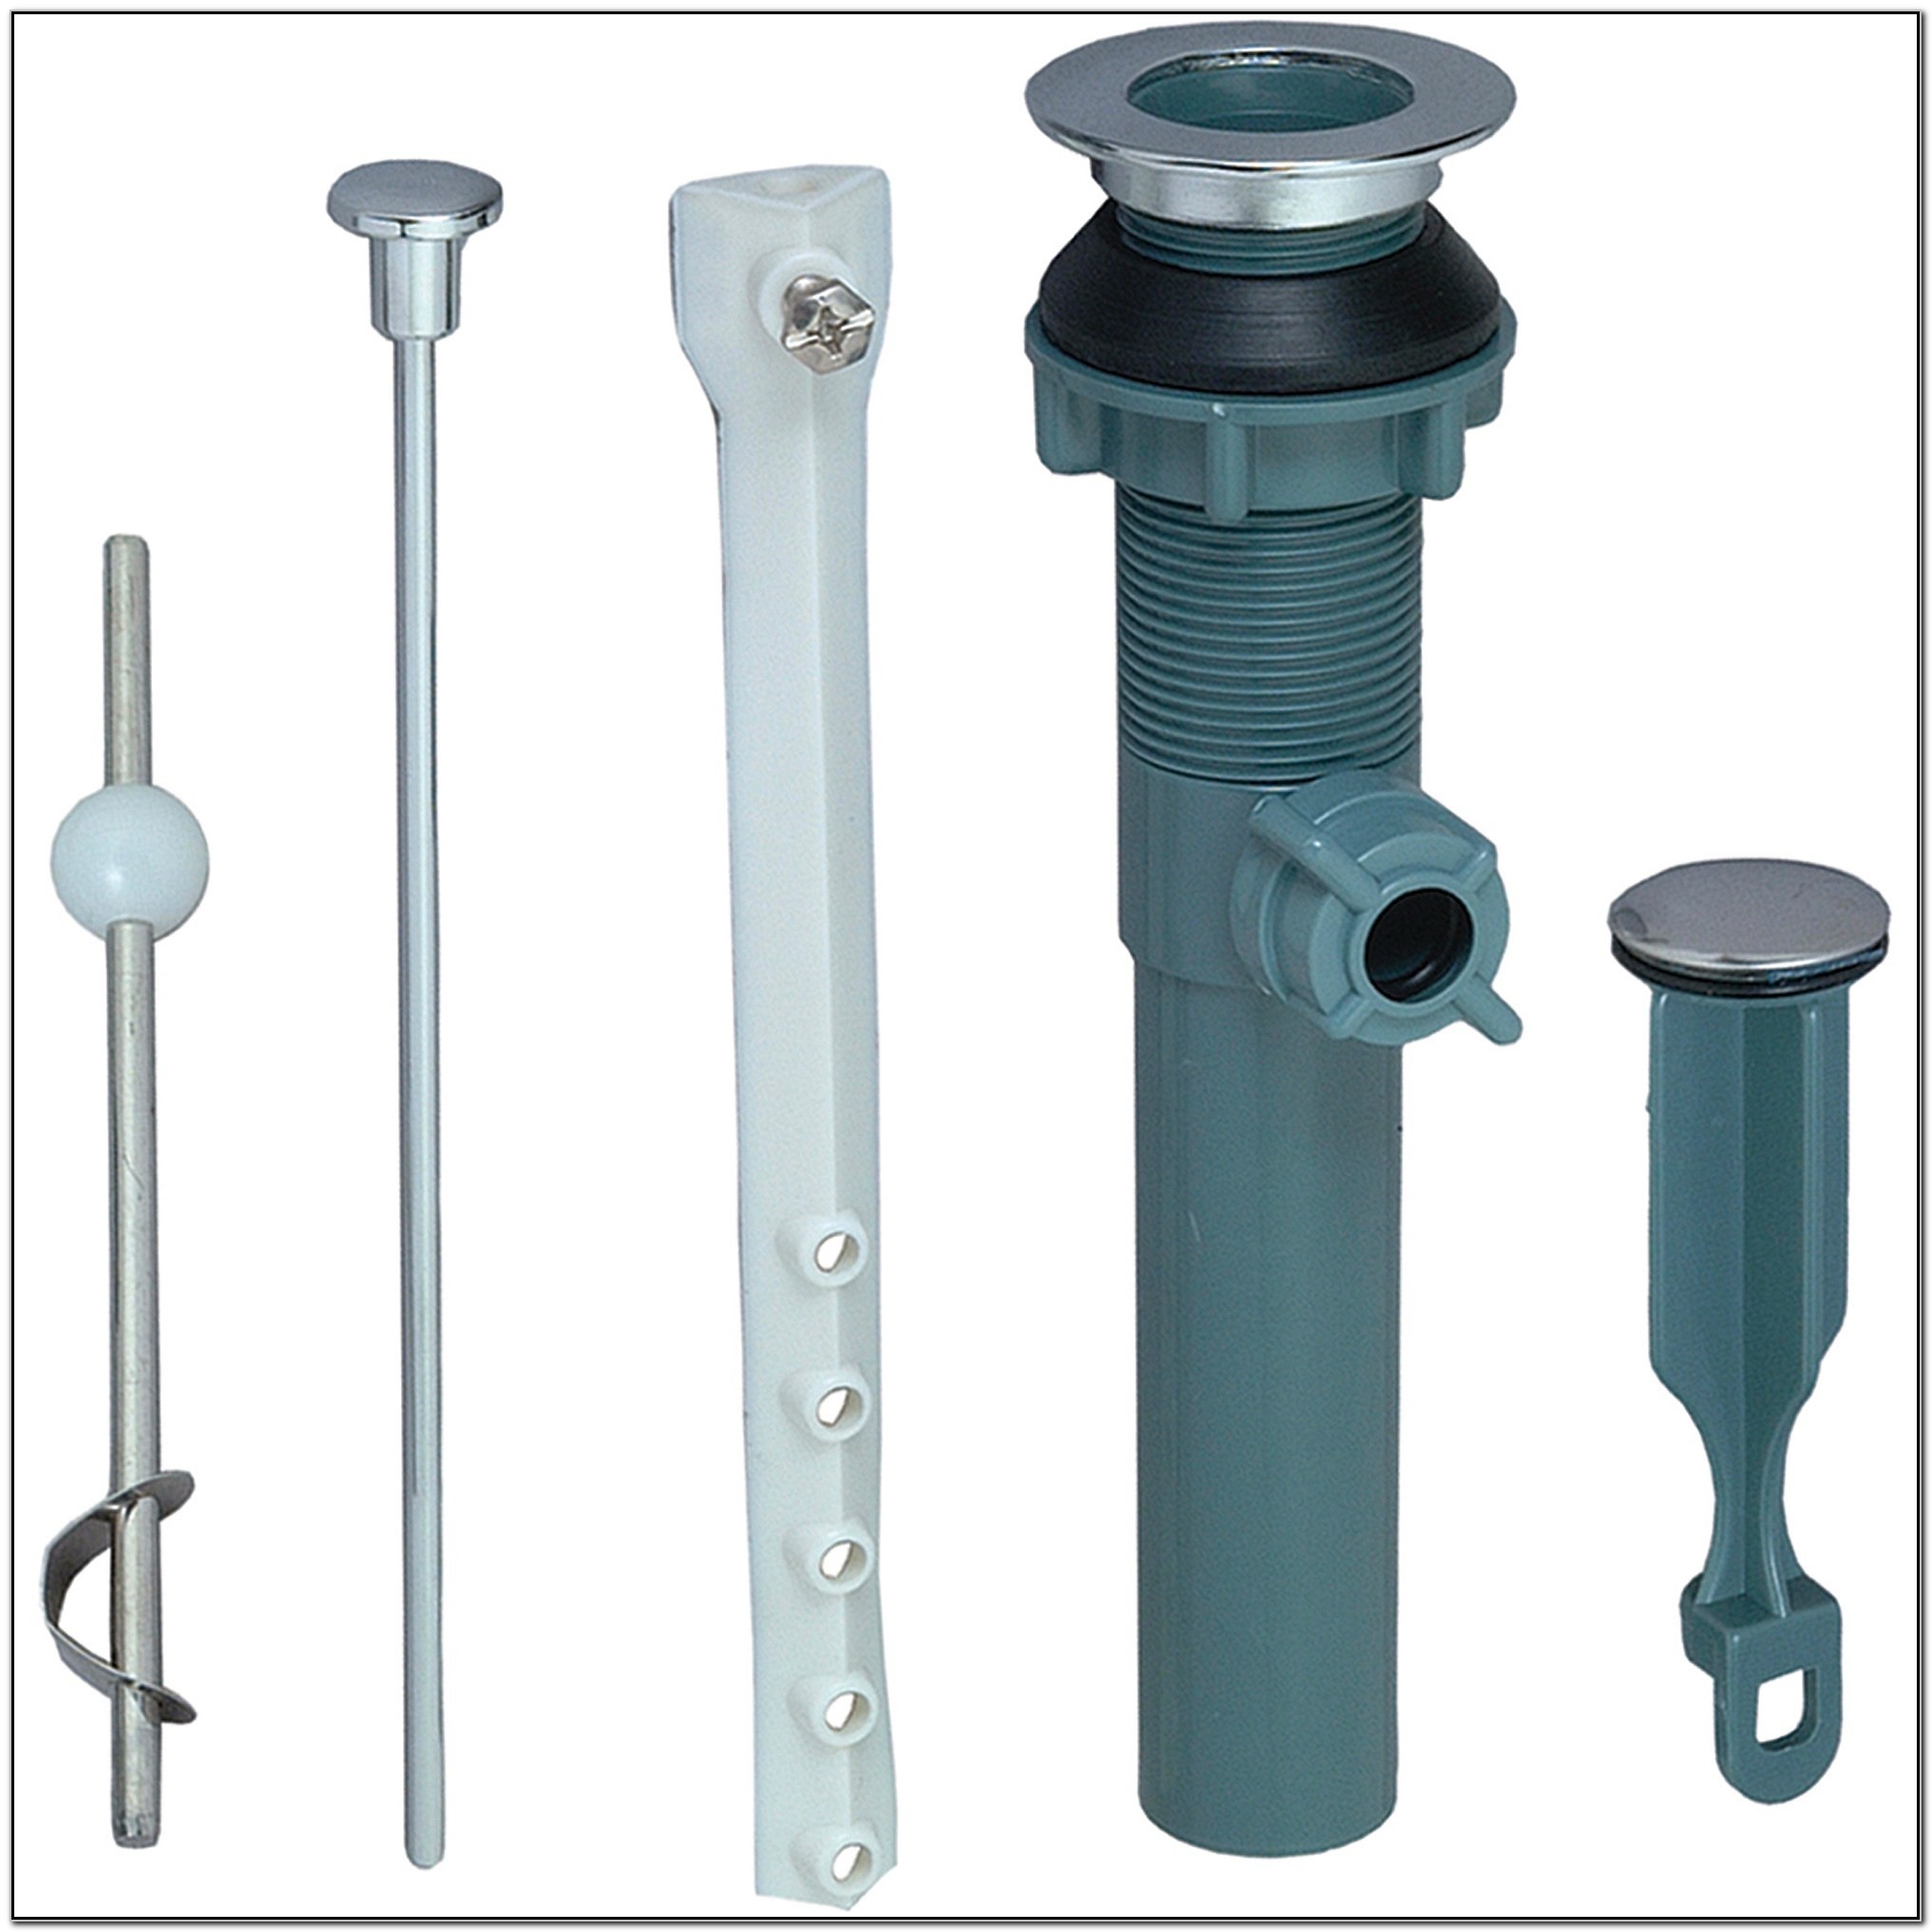
- Drain Strainer: The drain strainer is the visible part of the assembly, usually a metal or plastic cover that sits over the drain opening. It prevents large objects like hair or debris from entering the drain pipe and causing clogs.
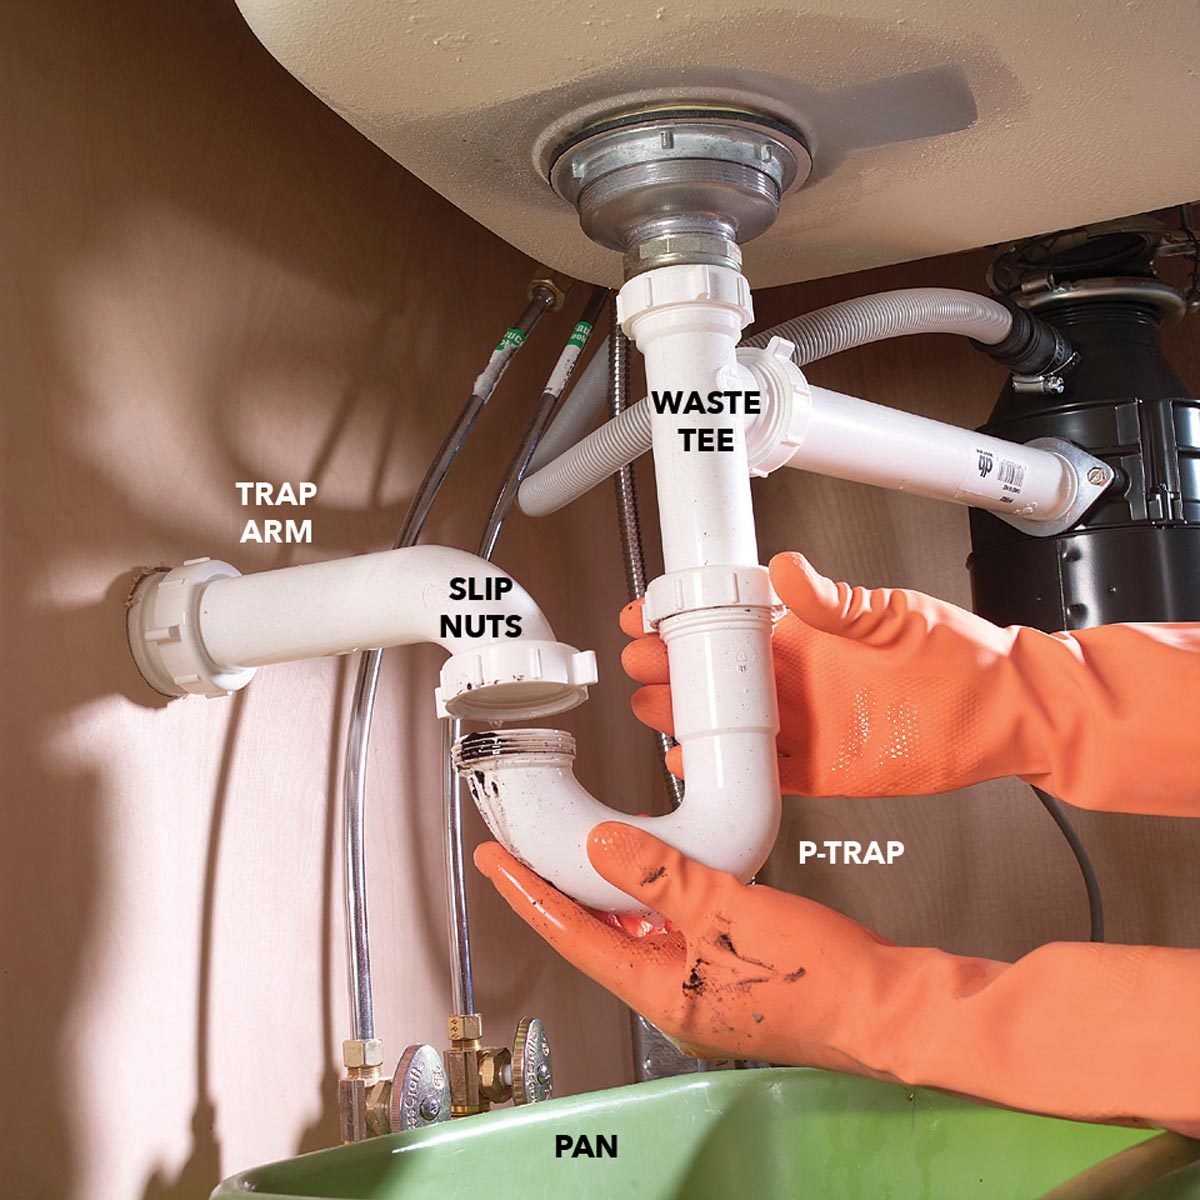
- Drain Tailpiece: This is a short pipe that connects the drain strainer to the P-trap. It is typically made of PVC or ABS plastic and helps extend the drain pipe to the correct length for proper installation.
- P-Trap: This is a U-shaped pipe filled with water that acts as a seal, preventing sewer gases from entering the bathroom. The P-trap is essential for maintaining a healthy indoor environment.
- Drain Pipe: This is the main pipe that carries wastewater from the P-trap to the main drain line. It is usually made of PVC or ABS plastic and can vary in size depending on the flow rate required.
How a Bathroom Vanity Drain Assembly Works
The drainage process begins when water flows down the sink and through the drain strainer. The drain tailpiece then connects the strainer to the P-trap, which traps water in its U-shaped section, forming a seal. As more water flows into the P-trap, it eventually overflows, pushing the water through the drain pipe and into the main drain line. The water trapped in the P-trap acts as a barrier, preventing sewer gases from escaping back into the bathroom.
Types of Bathroom Vanity Drain Assemblies

Choosing the right bathroom vanity drain assembly is crucial for both functionality and aesthetics. Different types offer varying features and benefits, making it important to understand their distinctions before making a decision.
Pop-Up Drain Assemblies
Pop-up drain assemblies are the most common type of drain used in bathroom vanities. These drains feature a lever that, when pushed down, allows water to flow out of the sink. The lever is connected to a rod that raises and lowers a stopper inside the drain.
Advantages of Pop-Up Drain Assemblies
- Simple and Affordable: Pop-up drain assemblies are typically the most affordable option and easy to install.
- Widely Available: They are readily available in various finishes and styles to match your vanity.
- Reliable: Pop-up drains have a proven track record of reliability and durability.
Disadvantages of Pop-Up Drain Assemblies
- Potential for Leaks: The lever mechanism can sometimes leak if not properly installed or if the seal wears out.
- Less Hygienic: The lever can accumulate dirt and grime, making it less hygienic than other options.
Push-Button Drain Assemblies
Push-button drain assemblies operate by pushing a button to open and close the drain. The button is connected to a mechanism that controls the stopper inside the drain.
Advantages of Push-Button Drain Assemblies
- Sleek and Modern: Push-button drains offer a more modern and minimalist look than pop-up drains.
- Easier to Clean: The button design makes it easier to clean and maintain than a lever.
- More Hygienic: The button mechanism is generally more hygienic than a lever.
Disadvantages of Push-Button Drain Assemblies
- More Expensive: Push-button drains are typically more expensive than pop-up drains.
- Potential for Malfunction: The button mechanism can sometimes malfunction, requiring repairs.
Overflow Drain Assemblies, Bathroom vanity drain assembly
Overflow drain assemblies are designed to prevent water from overflowing the sink. They feature an additional drain hole located above the main drain.
Advantages of Overflow Drain Assemblies
- Safety Feature: Overflow drains provide a safety measure to prevent water damage in case the main drain becomes blocked.
- Standard Feature: Most bathroom vanities come equipped with overflow drains.
Disadvantages of Overflow Drain Assemblies
- Aesthetically Unpleasing: The overflow hole can be considered aesthetically unpleasing by some.
- Potential for Clogging: The overflow drain can become clogged if not cleaned regularly.
Selecting the Right Type of Bathroom Vanity Drain Assembly
The best type of bathroom vanity drain assembly for your needs will depend on factors such as your budget, aesthetic preferences, and the size and style of your vanity.
- Budget: Pop-up drains are the most affordable option, while push-button drains are more expensive.
- Aesthetics: Push-button drains offer a more modern look, while pop-up drains are more traditional.
- Vanity Style: The size and style of your vanity will also influence the type of drain assembly you choose.
Installation and Maintenance of Bathroom Vanity Drain Assemblies: Bathroom Vanity Drain Assembly

Installing a bathroom vanity drain assembly is a fairly straightforward process that can be done by most DIY enthusiasts. However, it’s essential to follow the correct steps and use the right tools and materials to ensure a successful and leak-free installation. This section will guide you through the installation process, provide tips for troubleshooting common issues, and share advice on maintaining your bathroom vanity drain assembly for optimal performance and longevity.
Installing a Bathroom Vanity Drain Assembly
Installing a bathroom vanity drain assembly involves connecting the drain pipe to the vanity, securing the drain trap, and attaching the drain cover. Here is a step-by-step guide:
- Gather the necessary tools and materials:
- Adjustable wrench
- Channel-lock pliers
- Plumber’s tape
- Level
- Screwdriver
- Safety glasses
- Work gloves
- New bathroom vanity drain assembly
- PVC pipe and fittings (if needed)
- Disconnect the existing drain assembly:
- Turn off the water supply to the bathroom.
- Use a wrench to loosen the nuts connecting the drain pipe to the vanity and the drain trap.
- Carefully remove the old drain assembly, taking note of how the parts are connected.
- Connect the new drain pipe to the vanity:
- Apply plumber’s tape to the threads of the drain pipe and the vanity drain opening.
- Thread the drain pipe into the vanity drain opening, ensuring a secure connection.
- Tighten the connecting nut using an adjustable wrench.
- Install the drain trap:
- Apply plumber’s tape to the threads of the drain trap and the drain pipe.
- Thread the drain trap onto the drain pipe, ensuring a secure connection.
- Tighten the connecting nut using an adjustable wrench.
- Attach the drain cover:
- Align the drain cover with the drain opening.
- Use a screwdriver to secure the drain cover to the vanity.
- Test for leaks:
- Turn on the water supply to the bathroom.
- Run water into the vanity sink and check for any leaks around the drain assembly.
- If you find any leaks, tighten the connecting nuts or re-apply plumber’s tape to the threads.
Troubleshooting Common Issues with Bathroom Vanity Drain Assemblies
Issues with bathroom vanity drain assemblies are often related to clogs, leaks, or loose connections. Here are some common troubleshooting methods:
- Clogged drain:
- Use a plunger to try to dislodge the clog.
- If the plunger doesn’t work, try using a drain snake to remove the clog.
- If the clog persists, you may need to disassemble the drain assembly and manually remove the obstruction.
- Leaky drain:
- Check the connecting nuts for tightness. Tighten any loose nuts.
- Inspect the drain pipe and trap for cracks or damage. Replace any damaged parts.
- Ensure that the plumber’s tape is properly applied to the threads. Re-apply tape if necessary.
- Loose connections:
- Tighten any loose nuts connecting the drain pipe, trap, and vanity.
- If the connections are still loose, you may need to replace the old drain assembly with a new one.
Maintaining a Bathroom Vanity Drain Assembly
Regular maintenance can help to prevent issues with your bathroom vanity drain assembly and extend its lifespan. Here are some tips for maintaining your drain assembly:
- Clean the drain regularly:
- Remove any hair or debris that accumulates in the drain strainer.
- Use a drain cleaner to remove any buildup in the drain pipe and trap.
- Inspect for leaks:
- Check for leaks around the drain assembly regularly.
- Tighten any loose nuts or re-apply plumber’s tape if necessary.
- Avoid harsh chemicals:
- Harsh chemicals can damage the drain assembly over time.
- Use mild drain cleaners or natural cleaning solutions whenever possible.
A well-functioning bathroom vanity drain assembly is essential for keeping your bathroom tidy and free from water damage. If you’re considering a bathroom vanity with a middle tower, like those found on bathroom vanities with middle tower , remember to also check the drain assembly.
A properly installed and maintained drain will help ensure your vanity remains functional and beautiful for years to come.
A bathroom vanity drain assembly is a crucial part of the bathroom’s plumbing system, ensuring proper water drainage. When choosing a bathroom mirror to complement your 48-inch vanity, it’s important to consider the mirror’s size and shape to maintain a balanced aesthetic.
This guide can help you determine the ideal size for your mirror. Once you’ve selected your mirror, you can focus on ensuring the vanity drain assembly is in good working order to prevent any water damage.